Olympics Brygga
2022-12-07
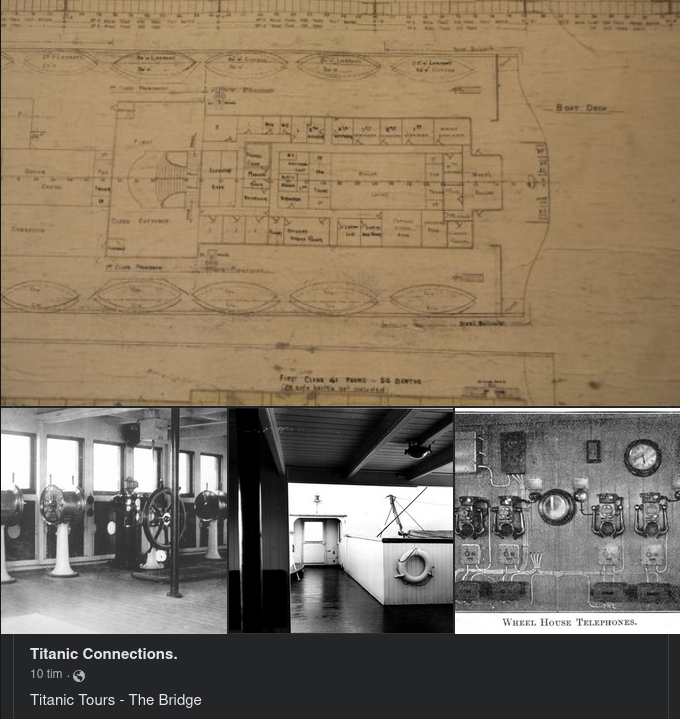
Titanic Tours - The Bridge
The brain of any vessel at sea is her bridge. In the case of Titanic, the bridge is where some of the most consequential actions of 14 April 1912 occurred. This week, we’re heading there to take a look at this important space.
Before we begin, a little historical note on the term “bridge.” Sailing vessels did not have a bridge, being instead navigated and commanded from the quarterdeck where the ship’s wheel could be found. But with the arrival of steam power and the equipping of ships with paddle boxes on their sides, the ship’s engineers needed a way to easily get from one paddle box to another and inspect the machinery. This took the form of a raised platform that stretched between the two boxes, forming a literal bridge. When paddles disappeared in favor of the screw propeller, the bridge stayed and became home to the ship’s command and navigating instruments.
On the Olympic-class liners, as with other liners of the era, the bridge was located forward atop the superstructure. Denoted by a series of nine rectangular windows at the front center of the boat deck, the bridge encompassed a Navigating Bridge just behind the windows, an enclosed Wheelhouse situated behind that space, and encompassed the swept-back wings on either side that ended in a covered “cab” where officers could observe goings on below and to either side. We will explore all of these spaces in today’s tour. Connected to the Wheelhouse were a Chart Room, a Navigating Room, and quarters for a harbor pilot. We will explore these rooms at a later date.
See the link below for the full article:
Exciting things are coming! Hit the link to learn more >>> https://titanicconnections.shop/
Content by: Nick Dewitt
Photo Captions (All Images from the Titanic Connections Archive)
It is important to note that all of these photographs are from the Olympic, as this space is not known to have been photographed on the Titanic.
1: The General Arrangement (GA) plans for the bridge area. These would be similar for both Olympic and Titanic, but Olympic was initially equipped with a curved-front Wheelhouse. Titanic’s was flat-fronted as presented here.
2: Olympic’s Navigating Bridge, showing the binnacle, wheel, and four of the five engine order telgraphs. The fold-down chart table can also be seen at the far left of the image. The dark objects below the windows are shutters that could be used if desired.
3: A view of Olympic’s bridge wing and wing cab. Again, the fold-down chart table can be seen in the foreground against the bridge wall. The wing cab clearly shows the large signaling lamp atop it. To the right of the cab near the bottom is the small hatch that would’ve allowed access to the sidelight.
4: The telephones on the aft wall of the Olympic’s Wheelhouse, shown along with various other types of equipment used to conn and command the ship.
Visa ditt stöd till det informationsarbete Carl genomför
Patreon

Swish

Scanna QR eller skicka till 076-118 25 68. Mottagare är Caroline Norberg.